Showing posts with label Room Makeovers. Show all posts

Friday, April 1, 2011

My Country/Cottage Guest Bedroom

I haven't posted in over a week-  I just started a new job, and I have to start at 6:00 a.m., so I've been very busy and very exhausted.  I have to get used to a whole new schedule, after being a stay- at- home wife for a year.  Don't get me wrong, I loved being at home and doing all the projects and things that I just never had the time or energy for, when I was a Retail Manager, but I really missed the social interaction and of course, the money is an added bonus.  I am working on the Merchandise Execution Team for Home Depot-
 ( this is there own in-store team of reps, that service different departments within the store).  The great thing is, it's Mon - Fri, no nights or weekends ( yippee!!!!)  Anyways, that's why I haven't had time to post anything until now.

 This week, I'm going to do a post, mostly pictures, of one of my decorating projects from several years ago.  We have a basement apartment in our house, which we used to rent out, but now we use the extra space for ourselves.  I have my art studio/sewing room/craft room, in what used to be the kitchen, a
 rec- room ( yet to be remodeled),  a spare bathroom ( which my husband was banished to, as soon as it became vacant- I think separate bathrooms is a great thing in a marriage), and a second guest bedroom. 

The spare bedroom in the basement has gone through many transformations over the years- I lived in the basement apartment many years ago, and it was painted a bright turquoise blue ( this was in style in the early 1990's). Before that, is was white, with little butterflies cut out of wallpaper , pasted all over the walls.  This was not my decorating idea, but that of the former owner ( I'm sure it was a little girls room).  Then it went back to white, after we rented it out to a nice young man ( turquoise just wasn't his thing- I wonder why?)  When we finally stopped renting out the basement, I had a great time decorating this bedroom- I decided on a cute country/cottage theme, in cream and shades of blue.  Unfortunately, I don't have any before pictures, but I'll share the after pictures with you here:


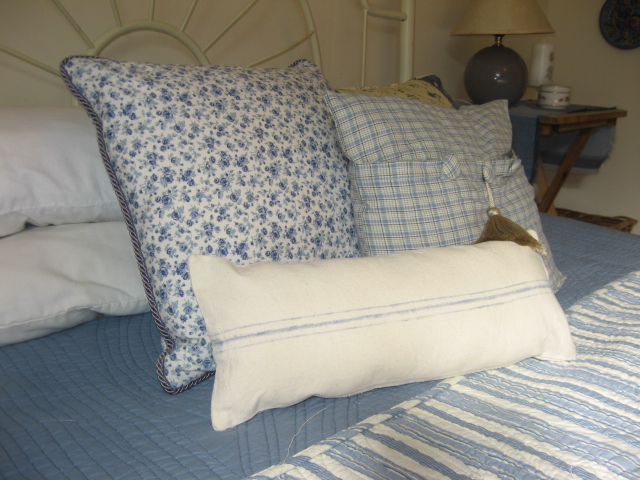
The bed in this room was my first ever trash-to-treasures project.  My husband found the bed, abandoned at a favourite walking spot in the valley near our home.  He came home one day and told me there was a wrought- iron bed just left in the field- it was dark green at the time, and only had 3 of the 4 finials.  I told him to bring it home, and I new right away I wanted to spray paint it in a nice creamy white.  It took two cans of spray paint, because I didn't use a primer on it (I've since learned that you can save lots of time and money by using a spray primer first).  It was so dark, I didn't think I'd ever get it covered, but it turned out pretty good for a free headboard and footboard.  Then we bought a really inexpensive wooden frame and mattress from Ikea, and bolted the headboard and footboard to it.  It's actually a really comfortable bed.


I bought the quilted bedspread at Sears for $70.00, and made all the decorative cushions myself.  The front one is a very recent faux grain- sack cushion that I made with canvas and acrylic paint just last week. The little side table is a wooden t.v. tray from Ikea as well.


The rocking chair was mine, as a young girl, and I added a wooden applique, and stencil to the top.  I also distressed it, and made the plaid cushion for the seat.  The cute painted sheep and cow on the back wall are two of my original acrylic paintings.


The room is quite small, so I had to take pictures from all different angles to get  a good view of everything.


The wicker chest is from Pier One Imports, the frame leaning against the wall was made by me from decorative molding I bought at Home Depot.  I painted it blue, then dry brushed a cream color over it.   I also love the cute mirror from Winners/Homesense.


One of the best features of this room is the wall-to-wall,  built in closet.  It's way bigger then the one in my master bedroom, and therefore, I use this for storing off-season clothing, and other items.


Here's a better look at the side table, and I keep a wicker basket with back-copies of Country Living Magazine for my guests.  The rug is also from Ikea.


I made the Roman Shade with a contrasting blue striped fabric and but some blue glass bottles along the window ledge to catch the afternoon sunlight.  A sweet blue vase with white lilacs ( not real), adds a touch of casual country elegance to the painted radiator-cover box.These radiator covers are a great place to put accessories, and hide an unsightly radiator.  This along with 3 others were already in the house when we bought it.  They were all stained wood, so I painted them in the same color as the wall to make the room look bigger and more cohesive.


This is a close-up of the roman shade pull-cord that I made.  I macrame'd blind cording, added 3 clay beads, and then frayed the end after knotting it- it's pretty cute I think.

Well, that's my cute little Country/Cottage Guest Room.  Hope you like it. 

 P.S.- my trash-to-treasures armoire makeover is almost complete.  Watch out for the final reveal very soon.  It turned out soooo cute.  I can hardly wait to share it with everyone. 


Sunday, February 27, 2011

A New Bedroom Mirror and Rug

Hi. I hope everyone is having a good weekend. It's Saturday night and I'm just lounging on the couch, watching T.V., with my laptop perched on my lap.

Have you ever had one of those decorating days/ weekends when everthing just falls into place. Well I did this weekend. I mentioned in my last post that I was going antiquing, but I never ended up going because there was a bad-weather alert in Souther Ontario for Thursday afternoon ( which never happened after all). But all was not lost- I decided to go to one of my favourite off-priced home decor stores ( Homesense)   to look for a small wall- shelf for my bedroom. I didn't end up finding one, but I did find a great small rug on sale for $9.00 and a beautiful large mirror for over my bedroom dresser for $69.99. Considering I had $50.00 from a birthday cheque, it was a pretty good score at only $30.00 out of my pocket.


I immediately went home and put the new rug down, and it was perfect. Next, I tackled the mirror- I still have the almond glossy matching bedroom set from the 1980's that my parents bought me for my first apartment after college- complete with triple- arched art deco style mirror over the dresser. Why is the master bedroom always the last room to be properly furnished? Maybe because no one else really sees it. I sooooo hate that bedroom furniture, and can't wait to get rid of the entire set, but I know I can't do it all at once Patience!!!!

I did recover the headboard 6 years ago, so it's not too bad, and now I have the mirror. Here's some pictures of what our bedroom looks like now.


Here's the old mirror, circa 1980.


The beautiful, new mirror!!!!!


  What an improvement- YES!!!!!!!!!


Now here's my new rug.


I just put it at the foot of the bed, so you can see it as you walk in.

Here's the rest of the room.  I love the cream and sage- green combo and the way it's decorated, but I JUST hate the furniture.


Here's the bed ( I made all the cushions). And the headboard was part of the matching set, but I covered it with a diamond-pattern taffeta like fabric.


Here's the oh-so- lovely almond gloss armoire ( can you see why I want to get rid of it- just kick it to the curb already).
I love my art-work collage and the wrought- iron candle holder and quilt stand.  Some of the art-work is original watercolor my "moi".  I did the two on the armoire, and the top two in the middle of the collage, as well as the second from the left on the bottom.  One day I will post a separate page of all my watercolors, but for today, I'm just concentrating on the bedroom.

Here are a few of the decorative touches in the room.
 I love this little alcove, and the radiator -cover gives me a place for some more knick-knacks. And the hanging roses are from my wedding arrangements- I dried and sprayed them with hairspray.  Still perfect after three years.
I think this garland with the word "dream" hanging on it is sooooo cute.  And the roman- shade is linen, lined in black-out liner ( also made by me).

The curtains are raw-silk and soften up the square corners of the alcove.  I also love the curvy legs of this small wrought iron and tile table.

This chair is an antique and  used to sit in my husband's, grandmother's farmhouse, and was originally covered in dark turquoise damask.  It was stuffed with old bed-sheets and straw.  I redid the cushions and recovered it with this pretty sage- green damask.

Well, that's about the size of it- it's pretty small, but cosy and pretty.

Anyways, as I was saying- this weekend just fell into place for decorating.  Tonight, just before dinner, my hubby decided to walk to the corner watering-hole for a beer.  Five minutes later, the phone rings, and it's hubby.  "Guess what?"  he says. " I was walking down our street, and someone has put out an antique armoire at the curb.  Run down and see if you like it." So I threw on a jacket and my crocs and headed down the  street.  And sure enough, there was a beautiful, wooden armoire with a mirror and a drawer, just waiting for someone to take it home.  It was the perfect size for our bedroom- just needs a small paint makeover.  So I ran back home, called the hubby and told him to to come straight home and get a dolly, while I guarded that" baby" with my life.  And then, I realized , there was also a cute table  and a working T.V. in the pile.  We need a new small  T.V. for the basement, and there was a sign taped to it saying " it works".  So we took all three pieces home-  SCORE!!!!!!!!!!

Now, I'm not going to post a picture of  these things, because the battery on my camera died, but you'll have to stay tuned for the awsomeness that I'm going to make out of this free armoire and table.


And the T.V.- it works!!!!!!!

Well, I guess that's about it.  I'm finishing off a few small DIY projects that I'll post in the next day or so, and then I can hardly wait to re-paint and makeover the armoire and table.

Til next time.  Au Revoir!!!!!

Tuesday, February 15, 2011

DIY- Laundry Room Makeover on a Budget

Well hello again.  I seem to be getting all the technical parts of this blogging business under way, so now I'm ready for another go at a project I did last November in our Laundry Room.We had the world's ugliest laundry room circa 1970 something ( barf !!!!)  It has THEE most hideous vinyl wallpaper and ugliest linoleum flooring that I'd ever seen, and it smelled like mold and mildew all the time, no matter what  I cleaned it with. I have been dying to redo it, but trying to get my husband motivated was useless, so I had to do it all myself ( well almost ).

It started back in Sept. of 2009, when the city water deptartment came a-knocking on our door.  They were trying to trace some illicit toilet paper and stuff that was getting into the local creeks.  They narrowed it down to our street, and after some testing, discovered that our water hook-up was done incorrectly.  Apparently, at some point, the person who renovated our soooo ugly laundry room and basement apartment kitchen, had hooked up the water to the wrong pipes.  Yikes!!!!!  We were on the hook for $8000.00 + to get the situation remedied.  We had to have the floor of the kitchen and laundry room dug up and the water hooked up to the sewage pipes, and not the pipes that lead out to the lakes and streams, and we only had 1 month to do it or we would be fined $10,000. We were fit to be tied, but that's the life of a homeowner. We got it done, and retiled the kitchen right away, but the laundry room stayed as is with a nice concreted- over trench right through the middle of the laundry room. I did however buy enough tile to do said laundry room, but as we were both working full-time it never got done- until November 2010.

I was recently unemployed, so it was one of my first projects to tackle.  I really didn't feel like tackling the tiling myself, so we hired our friend, who's a self-employed, do anything that needs doing kind of guy. He only charged us $250.00 to tile the floor, which was right in our budget.  I had purchased a really nice peel and stick vinyl tile that looks just like marble stone tile from Home Depot, but it still needed to be glued down for the sake of being sturdy and permanent.

 Here's what the tile looks like:


Now that I had this lovely new floor, I just couldn't live with the ugly wallpaper any more, so I decided to make-over the entire laundry room. But, I had to do it on a tight budget, so I used as many things as I could that I already own. 

                                                            So....................    Here's what I did.


Before
First, I peeled off the ugly vinyl wallpaper with my bare hands.  It was so old that it just came off, but there was still an underlayer of paper and glue.  This had to be removed with wallpaper remover.  I bought a spray-on gel from Lowes and tried that first.  It was okay, but not as good as the old fashioned Sure-off that you mix with water and then spray on.  Luckily I still had some of that left from an old project, so I just used that.  You totslly saturate the paper and then using a putty knife, remove it.  If you're lucky, the whole piece will just come off, but usually it ripped and you have to scrape.  All-in-all, it's not too difficult.


I wish I had taken a picture before I peeled off
the old wallpaper, but you can still see a small
piece behind the washing machine.
 Lovely water-stained under paper.
 

Ugly laundry basin.


 Spraying the under-layer of paper and glue. Don't
forget good gloves (very stylish)!!!!!

 Scraping the old paper and glue off with a putty knife.
 Then wash the walls well with TSP (Trisodium Phosphate).  This is a very strong cleaner, so you need gloves, but not very fumey. This gets gets rid of any residual glue and dirt, in preparation for painting.


 All ready to paint now.  Just had to fill in a few nail holes and give a light sand.  Since it's a laundry room, I didn't do too much else, except tape around the cupboards and windows.


 Now for the fun.  I decided to use the new paint and primer from Behr. It was highly recommended to me by the man in the paint department at Home Depot, and I choose a color called Soft Wheat.  It's a nice warm tan, with a yellow under-tone.  It 's very pretty and matched the tile beautifully.  I really liked the paint, and ended up needing two coats, since my walls were white, but one gallon was all I needed, and there's still some paint left over for touch-ups .

                                         Here are the end result.  I really like the way it turned out:


Door to Laundry Room- no wreaths were harmed in the making of this blog

                                                             Here's the end result.


                         Here are some of the decorative item I used in the laundry room.


                                                                                                                                                                                          The Roman shade was made from Waverley Fabric I had at
 home, and the dried hydrangeas are from my garden.


 Luckily we had these these great built in cupboards   for lots of storeage.
Antique washing board purchased at my favourite Southworks Antique Mall in Cambridge ,Ontario.
This is my favourite Antique mall, and has 100's of dealors under one roof- great prices and lots of variety.


 Close-up of back-splash which I made from left-over peel and stick floor tiles.  I cut them into 4 inch square and stuck them right on the wall.  Then I used decorative furniture tacks in the corner for extra detail, and to keep them from coming off.


These vintage prints of an iron and washing producrs were
printed off the internet and framed in inexpensive frames
already had.


Dried hydrangeas from my garden.

 More vintage prints from the internet.
I love these clothespins from Walmart.  They don't
leave any marks on your clothes.
 These jars are also from Walmart, and I use them to
store lots of small items.
 These dividers hide the water heater, furnace and my husbands
 tools- they were also already in the laundry room.

 Over the door hooks keep my drying rack, etc. handy
 behind the sceen.
This wire modular shelf keeps tools organized
behind the dividers.


 Another close-up of the vintage iron print.
 Close-up of the vintage washing
 products print.

Well- I hope you've enjoyed this.  Please let me know what you think.  Here's a last before and after shot:


Before


After
      Bye til next time.  Au Revoir!!!!!