Monday, April 25, 2011

Shabby Chic Armoire Makeover- Part 3 ( The Inside )

As promised, here is the third and final installment of my Shabby Chic Trash-to-Treasure Armoire makeover.  I had to do three postings because it was such a long project, and I didn't want anyone to get bored with too much reading. To see the first 2 parts, click here. I must say though,  it turned out really cute- even my husband was impressed- he actually put his arms around it and gave it a hug and a kiss, and told me he loved it ( he's a super funny guy and makes me laugh all the time). Anyways, I'll get  right to the good stuff- pictures of what I did to the interior of the armoire.


Here's a shot of it set up in my bedroom. 
Here's  a picture of the old armoire that I had in my bedroom to show you how much cuter the new one is:


What a H-U-G-E improvement, if I do say so myself.


So here are the steps I took to make the inside look as good as the outside :


If you look closely at the inside of the armoire, there are recessed panels already inside, and I thought it would be really cute to put fabric covered panels inside.  So I went to the grocery store and collected cardboard boxes, cut them to size, and used masking tape to attach the fabric to the panels.  I found a really cute sage green and beige striped fabic at Fabricland- it almost looks like a vintage ticking fabric.


Next, I hot glued the panels to the recessed areas in the armoire.


I also added a fabric covered board to the bottom drawer:


For the front door, I bought a piece of foam- core, wrapped it in felt, and then wrapped the fabric around that.  I hot-glued this to the upper inside portion of the door, and put another fabric covered panel to the lower portion of the door. Then I used decorative upholstery tacks to the edges for extra hold, and a more decorative touch. I'm going to  hang my long chains and dangly earrings on this panel.


I added a Shabby Chic white mirror to the inside of the door as well.  I already had the mirror, and I think it looks cute tied with a fabric bow.


The armoire already had a hanging bar, but I added two shelves that I had cut to size from 1/4 inch MDF board that I painted .


I'm storing all my accessories in this armoire,and I still have tons of room left.  Now I can actually get to all my different purses without having to pull a big box out from under my bed.


The bottom drawer is for my "jammies".


And finally, I couldn't resist a few "glamour" shots that I styled with some of my jewellery.


These are some of my faux pearl pieces.


This is my wedding jewellery.

And finally:


This is my spa bathrobe that I made with 100% cotton waffle weave fabric, and a contrasting piping trim.  I'll be doing a more detailed posting on this soon, so be sure to check back for that.

Well that's it for this baby- I hope you enjoyed reading about it as much as I enjoyed creating and posting about it.  Until next time- Au  Revoir.


Monday, April 11, 2011

Shabby- Chic White Armoire Makeover - Part 2 ( The Reveal)

As promised, here is the final reveal of my armoire makeover.  As some of you  will remember, my husband found this vintage wardrobe/armoire left out at the end of a neighbours driveway in February.  We brought it home and I have been giving it a complete makeover.  It actually ended up being a lot more work then I had anticipated, but the final result was well worth it.  I just love how it turned out.  Here's a recap on how the armoire looked when we found it:


Before.


It had a funny old-wood smell to it- not moldy or musty- but just old, and I'm happy to announce that I finally got rid of the smell. I tried everything- baking soda, coffee grounds, vinegar wash, mild bleach wash.  None of these solutions worked.  Finally I coated the entire interior with Bin primer ( this is a shellac based primer that seals in odours and stains).  This got rid of the old-wood smell, but left a strong shellac odour which I really didn't want in my bedroom.  I have left it airing for several weeks, and finally added two lavendar sachets-one in the bottom drawer and one hanging in the main compartment.  Finally, it is suitable for putting into my room.  I decided to use it as an accessory armoire, and put some really pretty details on the inside.  So now , down to business, and here are the final  steps I did to get it looking great.  You can see Part 1 here.


After


This is the end result, and I will post all the steps on how I got this look, immediately following, for those of you who are interested.


Here's the front view before I added the glazing.


This is a view of the top side panel, before I added the final glaze.


I used Behr  Faux Glazing Medium and Behr Ultra latex paint in a flat sheen, both from Home Depot.  The color is called Bear Rug, and the code is S-G-790, for anyone that's interested.  I bought a sample size, since you really need very little paint  for the glaze.  The ratio is about 3-4 parts glazing medium to 1 part paint.


First you brush on a layer of the glaze.


Then you wipe off most of it with a damp, soft cloth.  The glaze stays in the cracks and crevices of the beadboard, as well as the areas the I distressed with a hammer.  It also gives the piece an old worn look, which is the look I was going for.


Here's another close-up of the glaze before it's all wiped off.


I used a small foam brush to get the glaze right into the crevices.


I used a piece of the scrap dowel inside my damp cloth to get some more of the glaze out of the cracks, as I didn't want it to be too dark.


Keep wiping off the excess until you get the look you want.


Here's a close-up of the bead- board side panel.  The trim around the panels is just wooden dowels that I cut with a saw and mitre box. The dowels mimic the bead in the bead-board, and are very inexpensive and easy to cut.  I just glued the cut dowels around the edges with Weldbond glue and let it dry over- night with painters masking tape to hold it in place.


Here are some more side views after I had wiped off most of the glaze.


Here's a close-up of the door with some good views of the distressing that I did with a palm sander and some glaze wiped over it.  I bought the crystal knobs at Home Depot as well.  I had originally intended to use some vintage crystal door knobs from my husbands old family home, but I couldn't find an  economical way to convert them into pull knobs.  These ones cost about $4.00 each and I like the added sparkle of a little "bling" on my new armoire.


Here's the bottom drawer, with close-ups of the wooden applique's that I added and the crystal pull knobs.

Here's a last look at the before and after:


Before


After
 

Well, I hope you've enjoyed the process so far ( I say so far, because I have even more to reveal with the inside of the armoire).  I did something extra- special on the inside, but you'll have to come back to see that in my next posting.  Otherwise, the posting would have been w-a-a-a-y too long. 

Until next time.  Au Revoir.

Friday, April 1, 2011

My Country/Cottage Guest Bedroom

I haven't posted in over a week-  I just started a new job, and I have to start at 6:00 a.m., so I've been very busy and very exhausted.  I have to get used to a whole new schedule, after being a stay- at- home wife for a year.  Don't get me wrong, I loved being at home and doing all the projects and things that I just never had the time or energy for, when I was a Retail Manager, but I really missed the social interaction and of course, the money is an added bonus.  I am working on the Merchandise Execution Team for Home Depot-
 ( this is there own in-store team of reps, that service different departments within the store).  The great thing is, it's Mon - Fri, no nights or weekends ( yippee!!!!)  Anyways, that's why I haven't had time to post anything until now.

 This week, I'm going to do a post, mostly pictures, of one of my decorating projects from several years ago.  We have a basement apartment in our house, which we used to rent out, but now we use the extra space for ourselves.  I have my art studio/sewing room/craft room, in what used to be the kitchen, a
 rec- room ( yet to be remodeled),  a spare bathroom ( which my husband was banished to, as soon as it became vacant- I think separate bathrooms is a great thing in a marriage), and a second guest bedroom. 

The spare bedroom in the basement has gone through many transformations over the years- I lived in the basement apartment many years ago, and it was painted a bright turquoise blue ( this was in style in the early 1990's). Before that, is was white, with little butterflies cut out of wallpaper , pasted all over the walls.  This was not my decorating idea, but that of the former owner ( I'm sure it was a little girls room).  Then it went back to white, after we rented it out to a nice young man ( turquoise just wasn't his thing- I wonder why?)  When we finally stopped renting out the basement, I had a great time decorating this bedroom- I decided on a cute country/cottage theme, in cream and shades of blue.  Unfortunately, I don't have any before pictures, but I'll share the after pictures with you here:


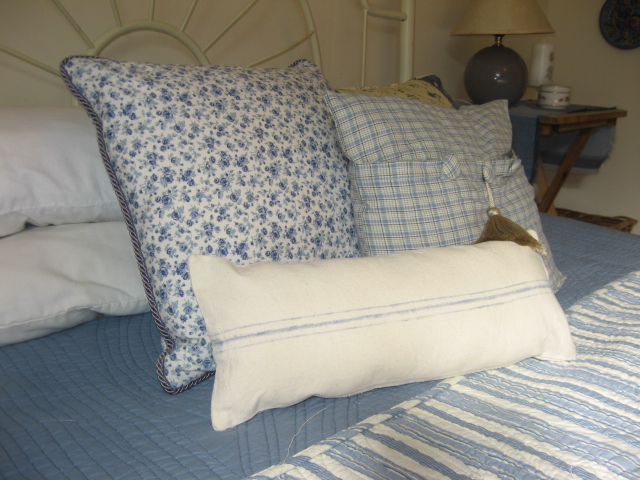
The bed in this room was my first ever trash-to-treasures project.  My husband found the bed, abandoned at a favourite walking spot in the valley near our home.  He came home one day and told me there was a wrought- iron bed just left in the field- it was dark green at the time, and only had 3 of the 4 finials.  I told him to bring it home, and I new right away I wanted to spray paint it in a nice creamy white.  It took two cans of spray paint, because I didn't use a primer on it (I've since learned that you can save lots of time and money by using a spray primer first).  It was so dark, I didn't think I'd ever get it covered, but it turned out pretty good for a free headboard and footboard.  Then we bought a really inexpensive wooden frame and mattress from Ikea, and bolted the headboard and footboard to it.  It's actually a really comfortable bed.


I bought the quilted bedspread at Sears for $70.00, and made all the decorative cushions myself.  The front one is a very recent faux grain- sack cushion that I made with canvas and acrylic paint just last week. The little side table is a wooden t.v. tray from Ikea as well.


The rocking chair was mine, as a young girl, and I added a wooden applique, and stencil to the top.  I also distressed it, and made the plaid cushion for the seat.  The cute painted sheep and cow on the back wall are two of my original acrylic paintings.


The room is quite small, so I had to take pictures from all different angles to get  a good view of everything.


The wicker chest is from Pier One Imports, the frame leaning against the wall was made by me from decorative molding I bought at Home Depot.  I painted it blue, then dry brushed a cream color over it.   I also love the cute mirror from Winners/Homesense.


One of the best features of this room is the wall-to-wall,  built in closet.  It's way bigger then the one in my master bedroom, and therefore, I use this for storing off-season clothing, and other items.


Here's a better look at the side table, and I keep a wicker basket with back-copies of Country Living Magazine for my guests.  The rug is also from Ikea.


I made the Roman Shade with a contrasting blue striped fabric and but some blue glass bottles along the window ledge to catch the afternoon sunlight.  A sweet blue vase with white lilacs ( not real), adds a touch of casual country elegance to the painted radiator-cover box.These radiator covers are a great place to put accessories, and hide an unsightly radiator.  This along with 3 others were already in the house when we bought it.  They were all stained wood, so I painted them in the same color as the wall to make the room look bigger and more cohesive.


This is a close-up of the roman shade pull-cord that I made.  I macrame'd blind cording, added 3 clay beads, and then frayed the end after knotting it- it's pretty cute I think.

Well, that's my cute little Country/Cottage Guest Room.  Hope you like it. 

 P.S.- my trash-to-treasures armoire makeover is almost complete.  Watch out for the final reveal very soon.  It turned out soooo cute.  I can hardly wait to share it with everyone.